Showing posts with label knitting. Show all posts

Wednesday, 3 July 2019

Completed Jumper

Welcome!

I have completed my first ever jumper! And I have worn it!


I used the Winterly pattern by Suvi Simola on Ravelry.


I chose this pattern for a few reasons:

  1. it is a top down pattern which means you can try it on as you go, which is a good thing as I had to adjust the pattern - more about that in a bit - and no sewing seams!
  2. There is a lace pattern which meant it wasn't just knitting in the round where I might easily get bored


I'm not good at guage swatches and I knew my guage wasn't right before I started so I adjusted as I went!
I began the with the correct number of stiches for my size but added additional rounds in the dark grey section to make the jumper wide enough and long enough to reach under the arms, in hind sight I think I made this a little wide, but the length is good.
I also added a little extra length.


The lace pattern wasn't too complicated and kept me interested.


As I was knitting hubby seemed to think I should be knitting a jumper for him - I guess that will have to be one of my next projects.

Happy Knitting all

Thank you for popping by

Vicki

Saturday, 27 June 2015

Twisted Rib Beanie - A Finished Project & Tutorial

Welcome,

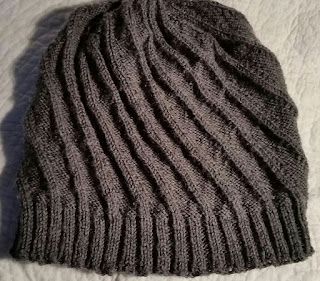
I have completed another beanie!  This one was a request from hubby, he wanted something with a spiral so I set out to work it out!


It must have been what he wanted, as he has been wearing it!

I thought I'd share a tutorial, mainly so that I will remember what I did if I want to make another one day!

Please be aware that I have never written a knitting pattern or tutorial before, I welcome any constructive feedback

Twisted Rib Beanie Tutorial

Supplies

  • 60gm/200m 4ply Merino Wool
  • 3mm 40cm circular needles


Gauge
I'm afraid I'm not good with this - I don't knit practice swatches, so I'll tell you what I do know:

  • my 8 stitch repeat measures 2.5cm unstretched
  • my finished beanie had a circumference of approximately 45cm unstretched
  • calculate how many stockinette stitches are required to make the unstretched circumferance required - you will need a multiple of 8.
Abbreviations
k - knit
p - pearl
ssk - slip 2 stitches knitwise from left to right needles. slip left needle into the 2 slipped stitches and knit
pfb - pearl front and back into same stitch
sl1 - slip 1 stitch knitwise from left to right needles
p2tog - pearl 2 stitches together
psso - pass the slipped stitch over previous stitch
slm - slip marker

Getting Started
Cast on 160 stitches (or calculated number calculated divisible by 8) ensuring the stitches aren't twisted
Place marker before proceeding

Knitting The Brim
Row 1 *k2, p2* repeat to end, slm
Repeat Row 1 until ribbing reaches 3.5cm in length

Note - if you don't want a knitted brim and want to launch straight into the pattern, knit row 1 once to avoid curling and proceed to the next section

Knitting The Pattern
Row 1 - *k2, p6* repeat to end, slm
Row 2 - *k2, p5, pfb* repeat to end, slm
Row 3 -  *k1, ssk, p6* repeat to end, slm
Repeat Rows 2 & 3 until total length reaches 18cm, finishing on Row 3

Tips
  • if you lose your place, count the number of pearl stitches between the knit ahead of where you are knitting, if there are 6 you are on row 2, if there are 7 you are on row 3
  • if you like a longer or shorter beanie, adjust the number of row repeats to suit the length you require

Shaping the Crown
Row 1 - *k2, p2tog, p3, pfb, k2, p5, pfb* repeat to end, slm
Row 2 - *k1, 22k, p5, k1, ssk, p6* repeat to end, slm
Row 3 - *k2, p4, pfb, k2,p2tog, p3, pfb* repeat to end, slm
Row 4 - *k1, ssk, p5* repeat to end, slm
Row 5 - *k2, p2tog, p2, pfb, k2, p4, pfb* repeat to end, slm
Row 6 - *k1, ssk, p4, k1, ssk, p5* repeat to end, slm
Row 7 - *k2, p3, pfb, k2, p2tog, p2, pfb* repeat to end, slm
Row 8 - *k2, ssk, p4* repeat to end, slm
Row 9 - *k2, p2tog, p1, pfb, k2, p3, pfb* repeat to end, slm
Row 10 - *k1, ssk, p3, k1, ssk, p4* repeat to end, slm
Row 11 - *k2,p2, pfb, k2, p2tog, p1, pfb* repeat to end, slm
Row 12 - *k1, ssk, p3* repeat to end, slm
Row 13 - *k2, p2tog, pfb, k2, p2, pfb* repeat to end, slm
Row 14 - *k1, ssk, p2, k1, ssk, p3* repeat to end, slm
Row 15 - *k2, p1, pfb, k2, p2tog, pfb* repeat to end, slm
Row 16 - *k1, ssk, p2* repeat to end, slm
Row 17 - *k1, sl, k2tog, psso* repeat to end, slm
Row 18 - knit slm
Row 19 - *k2tog* repeat until 10 stitches remain

Note - change to double pointed needle or magic loop knitting when needed

Finishing
Thread remaining wool onto a wool needle, thread through 10 remaining stitches to close hole. 
Weave in all ends

Please share if you have a go at knitting this, I'd love to see your finished projects.

Thank you for popping by
Vicki


Tuesday, 26 May 2015

Ribbed cable beanie - a finished project

Welcome!

After knitting the simple ribbed beanie, which can be found here, I decided to go for something different.  I was inspired by the knit on a cardigan I have.


Ribbed cable beanie

With all this ribbing it has knitted up quite tightly, but has lots of stretch in it.
Ribbed cable beanie - detail

I tried to work out the decreases as I went at the top, they aren't too bad, but I know what I want to try differently next time.
Ribbed cable beanie - decreases detail
I used 4ply yarn again, but I used wool this time.
Ribbed cable beanie

And finally as a reminder for myself I used:

  • 4 ply wool yarn
  • 3mm needles
  • 19 stitch pattern
  • cables every 9th row
  • decreasing started after 18cm
I promise that there has been some sewing going on around here too.  I will try and get a progress post up soon

Thank you for popping by
Vicki

Sunday, 10 May 2015

Khaki Ribbed Beanie - A finished project

Welcome

Last weekend hubby asked me to knit him a beanie, who am I to disagree?

He requested khaki/olive colour with a cotton thread - natural, warm and soft

As a good wife, I headed straight for the shop and bought a lovely khaki cotton 'wool'.


Of course when I got home the only pattern I could find was for a thicker wool and I didn't have double pointed needles or circular needles in the smaller size I needed.

I haven't knitted a beanie for a few years so needed the security of a pattern, so I knitted it flat in a basic rib and loosely based it on a pattern I had.

The seam didn't look too bad and can be worn either way, which is good as it's long enough for a brim.  

He even requested a label - who am I to disagree?

One week later the finished beanie emerged and he seems happy with it, he put it on straight a way, but I couldn't get him to model it


For my reference I used:
4 ply cotton
size 3 needles
cast on of 159 stitches with a 1x1 rib

Now I've got my beanie rhythm going again I will try and branch out with the pattern on the next one, which is apparantly going to be dark grey!

Thank you for popping by
Vicki

Tuesday, 7 April 2015

A long weekend of hand stitching

We are now at the end of our long weekend - it does feel like a break from work so that is always good.

I have spent some time on a number of hand stitching projects - I just don't seem to be able to stick to one at a time!

~~~~~~~~~~~~
Knitted Scarf

The first cab off the ranks was a scarf that I started knitting about 10 months ago and it has been sat neglected for some time.  Last winter I completed a few knitting projects, but this one just didn't get finished and as winter is again approaching it seems like a good reason to get it completed.

I am a slow knitter, and once I got the hang of the pattern again I was able to sit in front of the TV and knit away.

                                                             ~~~~~~~~~~~~
EPP Flower Quilt

I received my April list for my hexagon flower swap so promptly made the flowers for my partner Sandra from California.

She had no preference for colours or fabrics so I decided to try some fussy cutting - it's harder than you realise.  Well, the cutting isn't, but basting it so that it is neat and 'flow's' is.  I am not happy with the chevron flower so added a third for luck!

As usual I also completed 2 flowers for myself in pinks and purples.


This is a slow project - 4 flowers a month and no more.  So many options for the layout, but I'm sure when the time comes I'll manage to think of something.

~~~~~~~~~~~~

EPP Farmer's Wife Daughter Quilt

I have got the next 4 blocks for my Farmer's Wife quilt ready.  I cut out the paper pieces and fabric and place them in a bag until completed.


I have also basted some cornerstones and sashing pieces.


~~~~~~~~~~~~
EPP Diamond Star Quilt

And just because, I started cutting 60 degree diamond templates and fabric and then basting them.  


I love the look of star quilts, with a plain white hexagon in between. 

I have just started cutting into scrap and stash fabric choosing colours and fabrics I like, mainly ones with softer and not so saturated colour.  But as you can see there are no strict and hard rules.  The white hexagons will also soften it.


The farmers Daughter Quilt has to take priority, but sometimes a project where less concentration is required is great, I know you know what I mean!

~~~~~~~~~~~
Well, they should all keep me busy for a little while.

I didn't manage to get to the sewing machine, but I did enjoy the relaxing weekend (around study, work and chores).  I do have a couple of other works in progress when I do get back to the machine though.

Thanks for popping by
Vicki