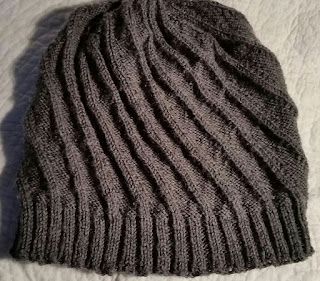
I have completed another beanie! This one was a request from hubby, he wanted something with a spiral so I set out to work it out!
It must have been what he wanted, as he has been wearing it!
I thought I'd share a tutorial, mainly so that I will remember what I did if I want to make another one day!
Please be aware that I have never written a knitting pattern or tutorial before, I welcome any constructive feedback
Twisted Rib Beanie Tutorial
Supplies
- 60gm/200m 4ply Merino Wool
- 3mm 40cm circular needles
Gauge
I'm afraid I'm not good with this - I don't knit practice swatches, so I'll tell you what I do know:
- my 8 stitch repeat measures 2.5cm unstretched
- my finished beanie had a circumference of approximately 45cm unstretched
- calculate how many stockinette stitches are required to make the unstretched circumferance required - you will need a multiple of 8.
Abbreviations
k - knit
p - pearl
ssk - slip 2 stitches knitwise from left to right needles. slip left needle into the 2 slipped stitches and knit
pfb - pearl front and back into same stitch
sl1 - slip 1 stitch knitwise from left to right needles
p2tog - pearl 2 stitches together
psso - pass the slipped stitch over previous stitch
slm - slip marker
Getting Started
Cast on 160 stitches (or calculated number calculated divisible by 8) ensuring the stitches aren't twisted
Place marker before proceeding
Knitting The Brim
Row 1 *k2, p2* repeat to end, slm
Repeat Row 1 until ribbing reaches 3.5cm in length
Note - if you don't want a knitted brim and want to launch straight into the pattern, knit row 1 once to avoid curling and proceed to the next section
Knitting The Pattern
Row 1 - *k2, p6* repeat to end, slm
Row 2 - *k2, p5, pfb* repeat to end, slm
Row 3 - *k1, ssk, p6* repeat to end, slm
Repeat Rows 2 & 3 until total length reaches 18cm, finishing on Row 3
Tips
- if you lose your place, count the number of pearl stitches between the knit ahead of where you are knitting, if there are 6 you are on row 2, if there are 7 you are on row 3
- if you like a longer or shorter beanie, adjust the number of row repeats to suit the length you require
Shaping the Crown
Row 1 - *k2, p2tog, p3, pfb, k2, p5, pfb* repeat to end, slm
Row 2 - *k1, 22k, p5, k1, ssk, p6* repeat to end, slm
Row 3 - *k2, p4, pfb, k2,p2tog, p3, pfb* repeat to end, slm
Row 4 - *k1, ssk, p5* repeat to end, slm
Row 5 - *k2, p2tog, p2, pfb, k2, p4, pfb* repeat to end, slm
Row 6 - *k1, ssk, p4, k1, ssk, p5* repeat to end, slm
Row 7 - *k2, p3, pfb, k2, p2tog, p2, pfb* repeat to end, slm
Row 8 - *k2, ssk, p4* repeat to end, slm
Row 9 - *k2, p2tog, p1, pfb, k2, p3, pfb* repeat to end, slm
Row 10 - *k1, ssk, p3, k1, ssk, p4* repeat to end, slm
Row 11 - *k2,p2, pfb, k2, p2tog, p1, pfb* repeat to end, slm
Row 12 - *k1, ssk, p3* repeat to end, slm
Row 13 - *k2, p2tog, pfb, k2, p2, pfb* repeat to end, slm
Row 14 - *k1, ssk, p2, k1, ssk, p3* repeat to end, slm
Row 15 - *k2, p1, pfb, k2, p2tog, pfb* repeat to end, slm
Row 16 - *k1, ssk, p2* repeat to end, slm
Row 17 - *k1, sl, k2tog, psso* repeat to end, slm
Row 18 - knit slm
Row 19 - *k2tog* repeat until 10 stitches remain
Note - change to double pointed needle or magic loop knitting when needed
Finishing
Thread remaining wool onto a wool needle, thread through 10 remaining stitches to close hole.
Weave in all ends
Please share if you have a go at knitting this, I'd love to see your finished projects.
Thank you for popping by
Vicki


